
Integrate Affinda with Zapier Using Eden AI

You can optimize your workflow by seamlessly integrating Affinda through Eden AI with Zapier. This comprehensive guide will take you through the step-by-step process, empowering you to harness the full potential of automation in your tasks.
Eden AI presents an easy and ready-to-use integration for invoice, receipt, ID and resume parser. Through our integration, just need to select, Affinda, the language and import your document. Moreover, Eden AI integration returns a structure and clear output. The only other alternative on Zapier to use Affinda is to use an HTTP action, set up the API call from scratch and get in response a raw json format.
Step 1: Navigate Zapier Marketplace
Begin your integration journey by visiting the Zapier marketplace. Search for the Eden AI integration to explore its capabilities.


Within the Eden AI integration, you’ll find several AI feature actions that will serve as pillars for introducing Eden AI into your automated workflows.
Step 2: Zap Setup on Zapier
Access your Zapier account and initiate the creation of a new Zap. Select a trigger that aligns with your workflow, such as Gmail, to kickstart the automation process.
Integrate a new module into your Zap and locate Eden AI within the available options. This step is pivotal in establishing a seamless connection between Zapier and Eden AI.

Upon selecting Eden AI, narrow down the specific event that will trigger your workflow. In this case, search for "Resume Parser"

Step 3: Connecting Your Eden AI Account
If you haven't done so already, create an account on Eden AI using the provided [referral link]. This account will be the gateway to unlocking the powerful capabilities of Eden AI.
Retrieve your API key from the homepage of Eden AI. When linking Eden AI to Zapier, it's crucial to prefix your API key with "BEARER" before pasting it into the designated field.


Step 4: Configuring the Eden AI Module
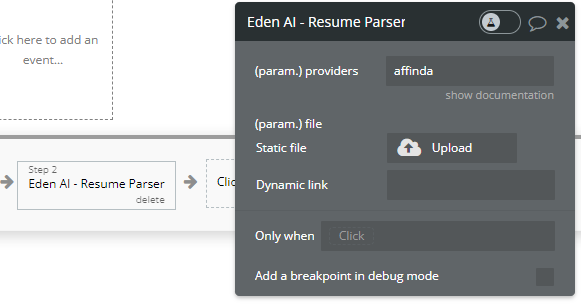
Input the file you wish to analyze seamlessly. For example, if your data originates from Gmail attachments, seamlessly integrate it into the Eden AI workflow for thorough analysis.
Choose “Affinda” as provider and configure the action to specify where you want the analyzed data to be stored. Popular choices include platforms like Google Sheets.

Step 5: Saving and Activating Your Zap
With the configuration complete, your Zap is ready for action. Activate it to witness the transformative power of Affinda in automating your tasks.
Explore the Affinda functionality within Zapier to efficiently manage and utilize the analyzed data as per your workflow requirements.
Bonus Tip: Time-Saving Templates
Navigate to the Template page within Zapier, a treasure trove of pre-configured templates.
Streamline your integration process by searching for "Eden AI" templates tailored to your specific needs. This bonus tip ensures a quicker implementation of Eden AI into your workflow.

By following these comprehensive steps, you'll not only seamlessly integrate Eden AI into your Zapier workflows but also unlock a new realm of efficiency and productivity. Embrace the power of automation to streamline your processes and focus on what matters most.
Integrating Affinda with Make Using Eden AI
Make is another tool that allows you to create more efficient workflows. Eden AI can be your link between Affinda's superb AI and Make's capabilities. Follow these simple steps to make the connection.
Step 1: Visit Make Marketplace
The first thing to do is go to the Make.com marketplace. That is where you need to find Eden AI app.


Step 2: Scenario Setup on Make
Create a new scenario once you log into your Make account. This is when you need to connect Eden AI and make it a part of your scenario. Pick it from the list of available options.

Once Eden AI is selected, it's time to pick the trigger for your scenario. In this case, search for "Resume"

Step 3: Connecting Your Eden AI Account
You'll need an Eden AI account for this step. You can create it through this referral link. Once you are in, retrieve your API key. All you need to do is to paste it into the correct field.
Step 4: Configuring the Eden AI Module
It's time to analyze a file and see how it works. If your file is actually a Gmail attachment, you can use Eden AI and Affinda as a provider to complete that action and store the data wherever you want it to be.

Step 5: Saving and Activating Your Scenario
Now that your scenario is configured, you can activate it and use it anytime you like. It will prove itself to be a huge time-saver as it automates your tasks.
Integrate Affinda with Bubble Using Eden AI
Bubble can help you care applications without coding. That in itself is ahuge time-saver. However, if you add Affinda AI ability to process documents to that equation, you can create some powerful enterprise-grade solutions. Here is how you can use Eden AI to connect these two platforms. This is an easy step-by-step guide.
Step 1: Browse Bubble Marketplace
Find the Eden AI app in the Bubble plugins marketplace.

Step 2: App Setup on Bubble
From your Bubble account, start creating a new app. Go to the plugin section and find Eden AI

Install the first plugin that is listed.
Step 3: Connecting Your Eden AI Account
Log into your existing Eden AI profile. If you don't have an account, create a new one by using this referral link
You will find the API key you need to copy and paste to the appropriate field on the homepage of Eden AI.
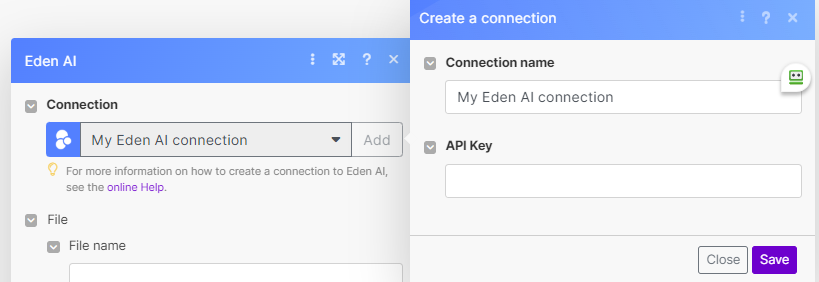
Now that you have installed the plugin, you can connect your Eden AI account by filling in the field “API Key”. When linking Eden AI to Bubble, it's crucial to prefix your API key with "BEARER" before pasting it into the designated field.

Step 4: Configuring the Eden AI Module
Now you can use the Eden AI plugin and configure it in your workflow:
Step 5: Saving and Activating Your App
With the configuration complete, your app is ready for action.
These are three of the most common ways people use Eden AI to facilitate integrations with Affinda. These easy to follow guides should help you get your integrations up and running in no time.


.jpeg)